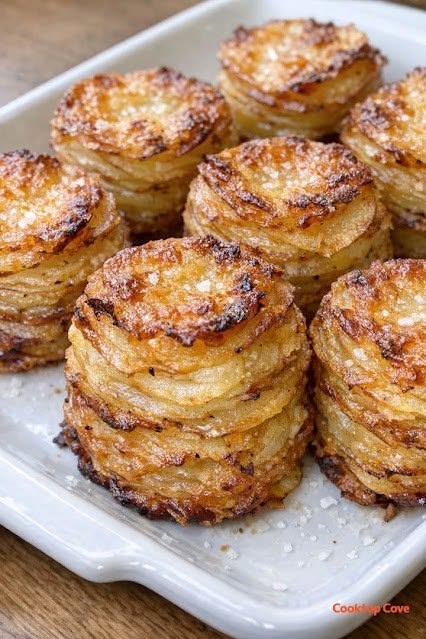
Crispy Potato Stackers: The Ultimate Guide to Making Golden, Crunchy Potato Perfection
Potatoes are one of the most versatile ingredients in any kitchen. Whether mashed, roasted, fried, or baked, they can easily become the highlight of a meal. Among the many delicious potato recipes available, Crispy Potato Stackers have gained popularity for their impressive appearance, crispy edges, and soft, buttery centers.
These elegant potato stacks are made by layering thinly sliced potatoes with butter, herbs, and seasonings before baking them in a muffin tin. The result is a beautifully crisp exterior with tender layers inside that are packed with flavor. Best of all, they’re surprisingly easy to prepare and work well for both casual family dinners and festive holiday meals.
If you’re looking for a side dish that’s simple, affordable, and guaranteed to impress, this recipe is a fantastic choice.
What Are Crispy Potato Stackers?
Crispy Potato Stackers are individual portions of thinly sliced potatoes layered with melted butter, herbs, cheese (optional), and seasonings. They’re baked until the edges become perfectly golden and crispy while the centers remain soft and creamy.
Unlike traditional roasted potatoes, stacking the slices allows every layer to absorb flavor while creating a beautiful presentation.
These potato stacks pair wonderfully with grilled meats, roasted chicken, seafood, burgers, or vegetarian dishes.
Why You’ll Love This Recipe
There are plenty of reasons why Crispy Potato Stackers deserve a place in your recipe collection:
- Beautiful presentation
- Crispy golden edges
- Tender buttery centers
- Easy to prepare
- Budget-friendly ingredients
- Perfect for holidays and dinner parties
- Great for meal prep
- Easy to customize with herbs and cheese
- Family-friendly
- Baked instead of deep-fried
Ingredients
You’ll only need a handful of pantry staples.
Main Ingredients
- 6 medium Yukon Gold or Russet potatoes
- 4 tablespoons melted butter
- 2 tablespoons olive oil
- 2 cloves garlic, minced
- 1 teaspoon salt
- ½ teaspoon black pepper
- 1 teaspoon paprika
- 1 teaspoon dried thyme
- 1 teaspoon dried rosemary
- ½ teaspoon onion powder
Optional Ingredients
- ½ cup grated Parmesan cheese
- Fresh parsley
- Chopped chives
- Fresh thyme leaves
- Crushed red pepper flakes
- Shredded cheddar cheese
Kitchen Equipment Needed
Preparing Crispy Potato Stackers is much easier with the right tools.
You’ll need:
- Muffin tin
- Sharp knife or mandoline slicer
- Large mixing bowl
- Pastry brush
- Cutting board
- Aluminum foil
- Cooling rack
Choosing the Best Potatoes
Not every potato produces the same texture.
Yukon Gold
These are one of the best choices because they have:
- Creamy texture
- Rich flavor
- Crispy edges
- Beautiful golden color
Russet Potatoes
Perfect if you prefer:
- Extra crispy layers
- Fluffy interiors
- Larger stacks
Red Potatoes
These hold their shape well and have a slightly firmer texture.
Step-by-Step Instructions
Step 1: Prepare the Oven
Preheat your oven to 400°F (200°C).
Generously grease a standard muffin tin with butter or cooking spray.
Step 2: Slice the Potatoes
Wash the potatoes thoroughly.
Leave the skins on for extra texture or peel them if preferred.
Using a mandoline or very sharp knife, slice them into thin, even rounds about 1/16 inch thick.
Uniform slices help ensure even cooking.
Step 3: Make the Butter Mixture
In a large bowl combine:
- Melted butter
- Olive oil
- Garlic
- Salt
- Pepper
- Paprika
- Thyme
- Rosemary
- Onion powder
Whisk until fully combined.
Step 4: Coat the Potato Slices
Add the sliced potatoes to the bowl.
Gently toss until every slice is evenly coated with the butter mixture.
If using Parmesan cheese, mix it in at this stage.
Step 5: Stack the Potatoes
Arrange the potato slices into small stacks.
Carefully place each stack into a greased muffin cup.
Continue until all muffin cups are filled.
Press gently to help the stacks stay together.
Step 6: Bake
Cover loosely with foil.
Bake for 30 minutes.
Remove the foil.
Continue baking for another 20–25 minutes until the tops become deeply golden and crispy.
The edges should be beautifully browned.
Step 7: Cool Slightly
Allow the potato stacks to cool for about 5 minutes.
Carefully remove each stack using a spoon or offset spatula.
Garnish with chopped parsley or chives before serving.
Tips for Perfect Crispy Potato Stackers
Getting restaurant-quality results is easy with these helpful tips.
Slice Evenly
Even slices cook uniformly.
A mandoline makes this process much easier.
Don’t Skip the Butter
Butter creates rich flavor while helping the edges become wonderfully crisp.
Use a Muffin Tin
The muffin tin keeps the stacks compact while baking.
Season Every Layer
Since the potatoes are stacked, coating every slice ensures flavor throughout.
Bake Long Enough
The final uncovered baking time is essential for achieving crispy edges.
Don’t remove them too early.
Delicious Flavor Variations
One of the best things about this recipe is how easy it is to customize.
Garlic Parmesan
Add:
- Extra garlic
- Parmesan cheese
- Italian seasoning
Cheddar Bacon
Mix in:
- Shredded cheddar
- Crispy bacon bits
- Green onions
Herb Butter
Use:
- Fresh rosemary
- Fresh thyme
- Parsley
- Sage
Spicy Potato Stackers
Add:
- Cayenne pepper
- Chili flakes
- Smoked paprika
Ranch Style
Season with:
- Ranch seasoning
- Garlic powder
- Dried dill
Serving Suggestions
These crispy potato stacks pair beautifully with many main dishes.
Serve them alongside:
- Roast chicken
- Grilled steak
- Pork chops
- Turkey
- Baked salmon
- Meatloaf
- BBQ ribs
- Grilled vegetables
- Mushroom gravy
- Fresh garden salad
They also make an excellent appetizer with dipping sauces.
Best Dipping Sauces
Enhance your potato stackers with one of these flavorful sauces.
- Garlic aioli
- Ranch dressing
- Sour cream
- Chipotle mayo
- Honey mustard
- Spicy ketchup
- Cheese sauce
- Herb yogurt dip
Make-Ahead Instructions
Preparing ahead can save time, especially for holiday meals.
One Day Before
- Slice the potatoes.
- Store them in cold water in the refrigerator.
- Dry thoroughly before seasoning.
Or:
Completely assemble the stacks.
Cover tightly.
Refrigerate overnight.
Bake just before serving.
Storage Guide
Store leftovers in an airtight container.
Refrigerator
Keeps fresh for:
3–4 days
Freezer
Freeze for:
Up to 2 months
Wrap each potato stack individually before freezing.
Reheating Instructions
To restore crispiness:
Oven
Bake at 375°F for about 10–15 minutes.
Air Fryer
Heat at 350°F for 5–7 minutes.
Microwave
The microwave works in a pinch but won’t keep the edges as crispy.
Common Mistakes to Avoid
Avoid these common issues for the best results.
Cutting Thick Slices
Thicker slices won’t cook evenly.
Using Too Little Butter
Butter helps create crispy edges and rich flavor.
Overcrowding the Muffin Tin
Leave enough room for air circulation.
Removing Too Early
Give the potatoes enough time to brown.
Golden edges equal maximum flavor.
Forgetting to Grease the Pan
Greasing prevents sticking and helps the stacks release easily.
Nutritional Information (Approximate Per Serving)
Nutritional values vary depending on ingredients used.
- Calories: 220
- Protein: 4g
- Carbohydrates: 28g
- Fat: 11g
- Saturated Fat: 4g
- Fiber: 3g
- Sugar: 1g
- Sodium: 320mg
Frequently Asked Questions
Can I make Crispy Potato Stackers without cheese?
Absolutely. They’re delicious with just butter, herbs, and seasonings.
Which potatoes are best?
Yukon Gold and Russet potatoes both work exceptionally well.
Can I use sweet potatoes?
Yes.
Sweet potatoes create a slightly sweeter flavor and crisp nicely when baked.
Can I prepare them ahead?
Yes.
Assemble them several hours in advance and refrigerate until ready to bake.
Why aren’t my potatoes crispy?
Common reasons include:
- Slices were too thick.
- Too much moisture remained on the potatoes.
- Oven temperature was too low.
- Baking time was too short.
Can I make them in an air fryer?
Yes.
Arrange the stacks in small ramekins or silicone muffin cups that fit inside your air fryer basket.
Cook until the potatoes are tender and the edges are crisp.
Expert Tips for the Crispiest Results
Professional cooks often rely on a few simple techniques to achieve the perfect texture. After slicing the potatoes, pat them dry with paper towels if they seem wet. Excess moisture can create steam, preventing the edges from becoming crispy. Toss the slices gently so each one is coated with the butter and seasoning mixture, and avoid packing the stacks too tightly in the muffin tin. During the final minutes of baking, keep a close eye on them—those extra few minutes can make the difference between lightly browned and beautifully crisp.
If you’re serving these for a special occasion, sprinkle fresh herbs over the stacks just before bringing them to the table. The fresh flavor and vibrant color create a restaurant-quality presentation with very little effort.
Final Thoughts
Crispy Potato Stackers are proof that simple ingredients can create an unforgettable side dish. Their crunchy, golden edges, soft and flavorful centers, and elegant appearance make them suitable for everything from weeknight dinners to holiday celebrations. Because they’re easy to customize with your favorite herbs, spices, and cheeses, you can make them your own while keeping the preparation straightforward.
Whether you’re cooking for family, entertaining guests, or simply looking for a new way to enjoy potatoes, these baked stackers are sure to become a favorite. Serve them fresh from the oven with your preferred main course and dipping sauce, and enjoy a delicious side dish that’s both comforting and impressive.
